TIL 23.12.30 심화프로젝트 5일차
밍기적거리다가 발등에 불떨어져서 허겁지겁하고있다 밤샐거같다
## 필수구현사항

- [ ]  **메인페이지**
- 네비게이션 헤더(로그인,마이페이지,슬라이드, 이미지 클릭 시 페이지 이동 네비게이션
- 카테고리 클릭 시 알고리즘에 해당되는 명소추천  카테고리 상세페이지 이동.
- 지금 뜨는 지역명소 이미지 카드(이미지,지역명소 등록하기, 이미지 클릭 시 상세페이지 이동 네비게이션)
- 차박로그(이미지,프로필이미지,유저이름,리뷰글,위치, 차박로그 상세페이지  이동)
- 지도 API (지도에 있는 차박 위치 클릭 시 상세정보 보여주기)
- [ ]  **로그인,회원가입**
- *사용자가 이메일과 비밀번호를 입력할 수 있는 텍스트 필드와 전송 버튼.*
- [ ]  ***마이페이지***
- *프로필 사진등과 사용자 정보 표시*
- *프로필 사진 ,닉네임 등록,변경.*
- [ ]  **차박로그/차박명소 등록페이지**
- 사진 업로드(여러개 선택 기능), 해당 카테고리 선택 태그(마운틴뷰,리버뷰,오션뷰,신설),차박위치,제목,내용
- [ ]  **상세페이지**
- 카테고리 상세페이지
- 차박로그 상세페이지
- 차박명소 상세페이지
사실 내가 맡은부분은 엄청 작은 부분인데 막상 만들려니 끙끙대고있다
30분 고민해서 안나오는거면 바로 물어볼껄... 문제다 잘 안물어본다...자기혼자 해볼려고
개발자가 지양해야하는 태도이다.
암튼 현재 시간은 01:38분 2023년의 마지막 토요일이다
이것저것 기능 추가중이다 마지막에는 전체적으로 스타일 손볼 예정
로그인 성공시 메인페이지 이동 useNavigate
import { useNavigate } from "react-router-dom";원래는 useHistory 라는 훅이였는데 react-router 6버전 부터는 useNavigte로 바뀌었다한다
1. useHistory란? useHistory는 리액트에서 URL주소를 변경할 때 사용하는 Hook이다. 예를 들어, 로그인 버튼 또는 여러 목록 중에서 하나를 선택하여 클릭했을 때, URL주소를 변경시켜 URL주소와 일치하는 Route의 컴포넌트를 렌더링하기 위해 사용한다. 리액트 특성상, URL변경없이 내부 컴포넌트만 변경시켜 화면을 바꿔줄 수 있다. 하지만 URL을 바꿔주면 현재 어느 페이지에 있는지 대략적으로 알 수 있고, 검색 쿼리가 추가된 URL을 공유할 때, 사용자가 페이지의 초기 단계부터 검색 쿼리를 추가할 때 까지...
phsun102.tistory.com
const loginHandler = async () => {
    try {
      const userCredential = await signInWithEmailAndPassword(
        auth,
        loginEmail,
        loginPassword
      );
      setLoginEmail("");
      setLoginPassword("");
      dispatch(changeLoginStatus(true));

      await swal("로그인 완료 🏕️", "어서오세요!", "success");

      console.log("일반 로그인 성공!");
      navigate("/");
    } catch (error) {
      const errorCode = error.code;
      const errorMessage = error.message;

      swal(
        "Oops...",
        "등록되지 않은 회원이거나 유효하지 않은 이메일입니다.",
        "error"
      );
      console.log("error with Login", errorCode, errorMessage);
    }
  };
로그인 핸들러 마지막부분에 navigate(가고싶은 주소 ) 를 넣어두면된다
export default function Signup() {
  const [signupEmail, setSignupEmail] = useState("");
  const [signupPassword, setSignupPassword] = useState("");
  const [signupNickname, setSignupNickname] = useState("");
  const dispatch = useDispatch();
  const navigate = useNavigate();

  const checkInputs = () => {
    if (
      signupEmail.trim().length === 0 ||
      signupPassword.trim().length === 0 ||
      signupNickname.trim().length === 0
    ) {
      swal("정보를 모두 입력해주세요");

      return;
    }
    if (signupNickname.length < 2) {
      swal("닉네임은 2자 이상 10자 이하여야 합니다");
      setSignupNickname("");
      return;
    }
    if (signupNickname.length > 10) {
      swal("닉네임은 2자 이상 10자 이하여야 합니다");
      setSignupNickname("");
      return;
    }

    return true;
  };

  const signupHandler = async () => {
    if (!checkInputs()) {
      return;
    }

    try {
      const userCredential = await createUserWithEmailAndPassword(
        auth,
        signupEmail,
        signupPassword
      );
      await updateProfile(auth.currentUser, {
        displayName: signupNickname,
        photoURL: defaultphoto,
      });

      swal("Good Job!", "회원가입이 완료되었습니다!", "success");

      dispatch(changeMemberStatus(true));
      setSignupEmail("");
      setSignupPassword("");
      navigate("/login");
    } catch (error) {
      const errorCode = error.code;
      if (errorCode === "auth/email-already-in-use") {
        swal("Oops...", "이미 사용중인 이메일입니다!", "error");
      } else if (errorCode === "auth/missing-password") {
        swal("Oops...", "비밀번호를 입력해주세요!", "error");
      } else if (errorCode === "auth/invalid-email") {
        swal("Oops...", "이메일을 확인해주세요!", "error");
      } else if (errorCode === "auth/weak-password") {
        swal("Oops...", "비밀번호는 6자 이상이어야 합니다!", "error");
      }
      console.log("error with signup", errorCode);
    }
  };
  return (
    <SignupWrapper>
      <h1>🏕️ D:Live의 회원이 되어보세요!</h1>
      <InputSection>
        <SignupInput
          placeholder="이메일"
          type="email"
          value={signupEmail}
          onChange={(e) => setSignupEmail(e.target.value)}
        />
        <SignupInput
          placeholder="비밀번호 (6자 이상)"
          type="password"
          value={signupPassword}
          onChange={(e) => setSignupPassword(e.target.value)}
        />
        <SignupInput
          placeholder="닉네임"
          type="text"
          value={signupNickname}
          onChange={(e) => setSignupNickname(e.target.value)}
        />
      </InputSection>
      <ButtonSection>
        <h4>이미 회원가입을 완료했다면?</h4>
        <StyledButton
          type="button"
          onClick={() => {
            dispatch(changeMemberStatus(true));
          }}
        >
          <Link to="/login">로그인 하러가기</Link>
        </StyledButton>
        <StyledButton type="button" onClick={signupHandler}>
          회원가입 신청
        </StyledButton>
      </ButtonSection>
    </SignupWrapper>
  );
}
회원가입 페이지에 유효성 검사 추가중
이제 입력된 nickname을 어디서 꺼내올지 알아내야한다
현재시각 05:03?!?! (사실 중간에 딴짓했다) 헤이즐넛의 힘으로 현재 눈만 말똥말똥
뭔가 주말에쓰는 TIL은 일기마냥 쓰게된다.
회원가입시 파이어 스토어에 닉네임 추가하기
현재 챗gpt 와의 진솔한 대화를 통해 파이어 스토어에 닉네임값을 추가하였다
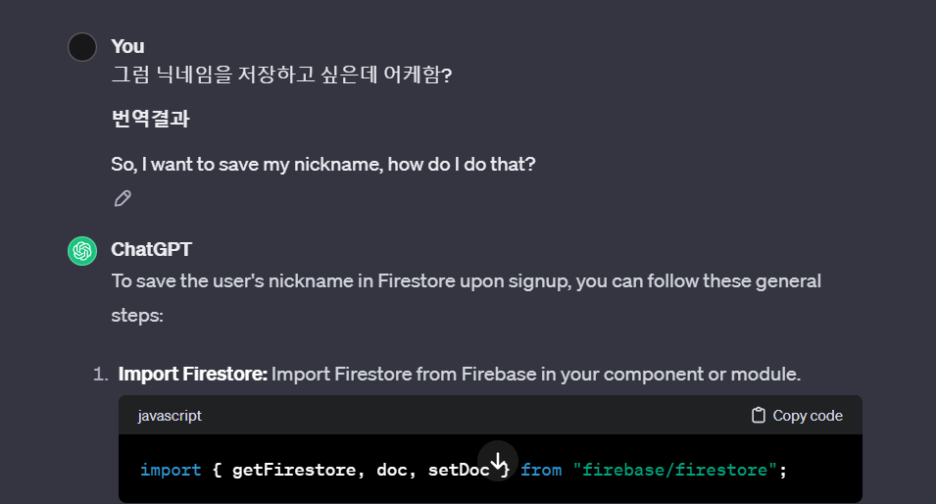
사진 설명을 입력하세요.
1 Firestore 가져오기: 구성요소 또는 모듈의 Firebase에서 Firestore를 가져옵니다.import { getFirestore, doc, setDoc } from "firebase/firestore";2 Firestore 초기화: Firebase 앱 구성을 사용하여 Firestore를 초기화합니다.import { initializeApp } from "firebase/app";
import { getAuth } from "firebase/auth";
const firebaseConfig = {
// Your Firebase config
};
const firebaseApp = initializeApp(firebaseConfig);
const db = getFirestore(firebaseApp);여기서 직접 가져오라는게아니라 firebase.js 에서 export로 가져오면된다 이건 예시
이건 현재 내 firebase.js
import { initializeApp } from "firebase/app";
import { getFirestore } from "firebase/firestore";
import { getAuth } from "firebase/auth";
import { getStorage } from "firebase/storage";

const firebaseConfig = {
  apiKey: process.env.REACT_APP_API_KEY,
  authDomain: process.env.REACT_APP_AUTH_DOMAIN,
  projectId: process.env.REACT_APP_PROJECT_ID,
  storageBucket: process.env.REACT_APP_STORAGE_BUCKET,
  messagingSenderId: process.env.REACT_APP_MESSAGIN_ID,
  appId: process.env.REACT_APP_APP_ID,
  measurementId: process.env.REACT_APP_MEASUREMENT_ID,
};

export const app = initializeApp(firebaseConfig);
export const storage = getStorage(app);
export const db = getFirestore(app);
export const auth = getAuth(app);
3 signupHandler 업데이트: signupHandler 함수에서
사용자 프로필을 업데이트한 후 닉네임을 Firestore에 저장하는 로직을 추가하세요.
const signupHandler = async () => {
if (!checkInputs()) {
return;
}
try {
const userCredential = await createUserWithEmailAndPassword(
auth,
signupEmail,
signupPassword
);
// Update Firebase Authentication user profile
await updateProfile(auth.currentUser, {
displayName: signupNickname,
photoURL: defaultphoto,
});
// Save nickname to Firestore
const userDocRef = doc(db, "users", auth.currentUser.uid);
await setDoc(userDocRef, { nickname: signupNickname });
swal("Good Job!", "회원가입이 완료되었습니다!", "success");
dispatch(changeMemberStatus(true));
setSignupEmail("");
setSignupPassword("");
navigate("/login");
} catch (error) {
// Handle errors
}
};4 Firestore 보안 규칙: Firestore 보안 규칙에서
사용자가 '사용자' 컬렉션에 쓸 수 있도록 허용하는지 확인하세요. 예를 들어:일단 다같이쓰는firestore라서 이건 추가안했다 그래도 기록
rules_version = '2';
service cloud.firestore {
  match /databases/{database}/documents {
    match /users/{userId} {
      allow write: if request.auth.uid == userId;
    }
  }
}
일단 4번을 제외하고 코드를 짠후 회원가입을 해보니
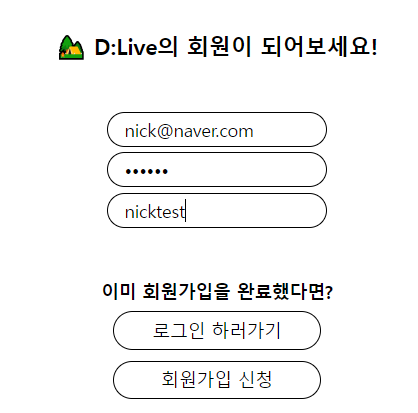
사진 설명을 입력하세요.

사진 설명을 입력하세요.
가입도 정상적으로 됐고
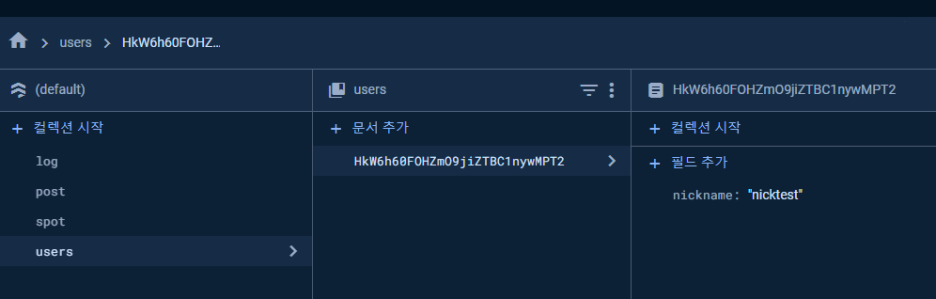
사진 설명을 입력하세요.
닉네임도 잘 저장되었다
이제 추가할건 기본 프로필 값과
상단 로그인 바에 닉네임과 프로필 사진 표시
그리고 마이 페이지 에서 프로필 사진 수정 닉네임 변경 내가쓴 게시물 조회 ....
요약
이게 목표다 빨리 해보자
파이어 스토어에 회원가입떄 생성된 id 고유값(uid) 넣기
try {
      const userCredential = await createUserWithEmailAndPassword(
        auth,
        signupEmail,
        signupPassword
      );
      const userId = userCredential.user.uid;
      await updateProfile(auth.currentUser, {
        displayName: signupNickname,
        photoURL: defaultphoto,
      });

      const userDocRef = doc(db, "users", auth.currentUser.uid);
      await setDoc(userDocRef, {
        email: signupEmail,
        nickname: signupNickname,
        avatar: defaultavatar,
        userId: userId,
      });
파이어 스토어 에 userid값 넣어주기성공했다 이제 고유 값이 있으니
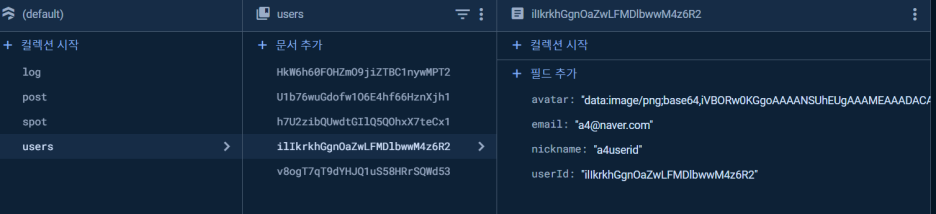
사진 설명을 입력하세요.
로그인 상태로 게시글 작성시 수정 삭제 를 만들수가있다 이메일과 닉네임도 잘 들어갔다
아바타 는 assets 폴더에서 이미지를 그대로 가져왔는데 일단 기본 이미지 이다
navbar에서 유저 프로필을 표시 해봐야겠다
https://firebase.google.com/docs/auth/cpp/manage-users?hl=ko
Firebase 문서 빌드 도움이 되었나요? Firebase에서 사용자 관리하기 이 페이지의 내용 사용자 생성 현재 로그인한 사용자 가져오기 사용자 인증 정보 유지 사용자 프로필 가져오기 제공업체의 사용자 프로필 정보 가져오기 사용자 생성 Firebase 프로젝트에서 신규 사용자를 생성할 때는 CreateUserWithEmailAndPassword 메서드를 호출하는 방법과 Google 로그인 또는 Facebook 로그인 과 같은 제휴 ID 공급업체를 이용해 사용자의 최초 로그인을 처리하는 방법이 있습니다. 또한 Firebase Co...
firebase.google.com
제공업체의 사용자 프로필 정보 가져오기
사용자에게 연결된 로그인 제공업체로부터 프로필 정보를 가져오려면 ProviderData 메서드를 사용합니다. 예:
firebase::auth::User user = auth->current_user();
if (user.is_valid()) {
  for (auto it = user.provider_data().begin();
       it != user.provider_data().end(); ++it) {
    firebase::auth::UserInfoInterface profile = *it;
    // Id of the provider (ex: google.com)
    std::string providerId = profile.provider_id();

    // UID specific to the provider
    std::string uid = profile.uid();

    // Name, email address, and profile photo Url
    std::string name = profile.display_name();
    std::string email = profile.email();
    std::string photoUrl = profile.photo_url();
  }
}
공식문서에서 제공하는 코드이다 이코드를 사용하면 현재 로그인한 프로필 정보들을 가져올수있다
// 마이페이지(Mypage)
import { useEffect, useState } from "react";
import { auth } from "../shared/firebase";
const Mypage = () => {
const [userProfile, setUserProfile] = useState(null);
useEffect(() => {
const fetchProfileInfo = async () => {
try {
const user = auth.currentUser;
if (user) {
// 사용자의 제공자 데이터를 반복
user.providerData.forEach((profile) => {
// 제공자의 ID (예: google.com)
const providerId = profile.providerId;
// 제공자에 특정한 UID
const uid = profile.uid;
// 이름, 이메일 주소 및 프로필 사진 URL
const name = profile.displayName;
const email = profile.email;
const photoUrl = profile.photoURL;
// 사용자 프로필 정보 상태 업데이트
setUserProfile({ providerId, uid, name, email, photoUrl });
});
}
} catch (error) {
console.error("프로필 정보 가져오기 오류:", error);
}
};
fetchProfileInfo();
}, []);
return (
<div>
{userProfile && (
<>
<div>제공자 ID: {userProfile.providerId}</div>
<div>UID: {userProfile.uid}</div>
<div>이름: {userProfile.name}</div>
<div>이메일: {userProfile.email}</div>
<div>프로필 사진 URL: {userProfile.photoUrl}</div>
</>
)}
</div>
);
};
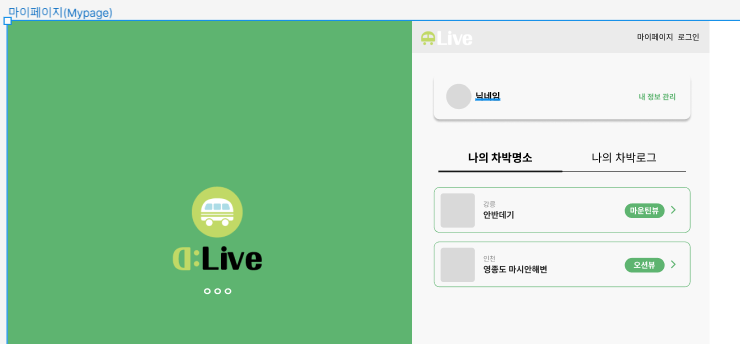
export default Mypage;물론 리액트 방식으로 바꿔서 사용했다

사진 설명을 입력하세요.
이제 스타일 컴포넌트랑 위치 그리고 프로필 나오게 조금 수정하면....

사진 설명을 입력하세요.
현재 11시:17분.... 파이어 스토어 수정 을 계속해서 시도하는중이다
프로필 값에 접근할수가없다
사용자 프로필 업데이트
사용자의 표시 이름 및 프로필 사진 URL 등의 기본 프로필 정보를 업데이트할 때는 updateProfile 메서드를 사용합니다. 예를 들면 다음과 같습니다.
import { getAuth, updateProfile } from "firebase/auth";
const auth = getAuth();
updateProfile(auth.currentUser, {
  displayName: "Jane Q. User", photoURL: "https://example.com/jane-q-user/profile.jpg"
}).then(() => {
  // Profile updated!
  // ...
}).catch((error) => {
  // An error occurred
  // ...
});
온갖 뻘짓 끝에 이제 프로필 닉네임도 수정이 가능해졌습니다
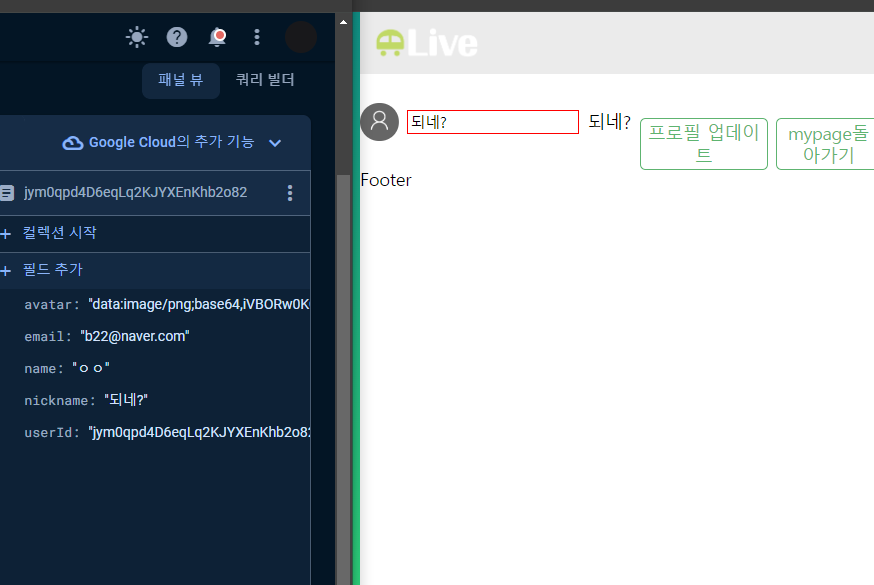
사진 설명을 입력하세요.
import { useEffect, useState } from "react";
import { auth, db } from "../shared/firebase";
import React from "react";
import styled from "styled-components";
import { updateDoc, doc, collection } from "firebase/firestore";
import Avatar from "components/common/Avatar";
import Button from "components/common/Button";
import { Link } from "react-router-dom";

// const updateUser = async (nickname, avatar) => {
//   // 원하는 데이터 가져옴
//   const userDoc = doc(db, "users", nickname);
//   try {
//     const res = await updateDoc(userDoc, { nickname: username });
//     console.log(res); // res는 undefined
//   } catch (e) {
//     console.log(e);
//   } finally {
//     console.log("end");
//   }
// };
const InfoFix = () => {
  const [userProfile, setUserProfile] = useState(null);
  const [username, setUsername] = useState("");
  const [avatar, setAvatar] = useState(null);

  useEffect(() => {
    const fetchProfileInfo = async () => {
      try {
        console.log(auth.currentUser);
        const user = auth.currentUser;

        if (user) {
          user.providerData.forEach((profile) => {
            const providerId = profile.providerId;
            const uid = profile.uid;
            const name = profile.displayName;
            const email = profile.email;
            const photoUrl = profile.photoURL;

            setUserProfile({ providerId, uid, name, email, photoUrl });
          });
        }
      } catch (error) {
        console.error("프로필 정보 가져오기 오류:", error);
      }
    };

    fetchProfileInfo();
  }, []);

  const updateUser = async () => {
    const userDoc = doc(db, "users", auth.currentUser.uid);

    try {
      await updateDoc(userDoc, { nickname: username });
      console.log("프로필이 성공적으로 업데이트되었습니다!");
    } catch (e) {
      console.error("프로필 업데이트 오류:", e);
    } finally {
      console.log("end");
    }
  };
  const handleUpdateProfile = async () => {
    try {
      const user = auth.currentUser;

      // 프로필 업데이트
      await updateDoc(doc(collection(db, "users"), user.uid), {
        name: username,
      });

      console.log("프로필이 성공적으로 업데이트되었습니다!");

      // 업데이트 된 프로필 정보를 다시 가져와서 상태 업데이트
      const userDoc = await doc(collection(db, "users"), user.uid);
      const userData = await userDoc.data();

      setUserProfile({
        providerId: userData.providerId,
        uid: userData.uid,
        name: userData.name,
        email: userData.email,
        photoUrl: userData.photoUrl,
      });
    } catch (error) {
      console.error("프로필 업데이트 오류:", error);
    }
  };
  return (
    <div>
      {userProfile && (
        <>
          <StLogCard>
            <StLogWrapper>
              <div>
                <Avatar />

                <Stnameinput
                  type="text"
                  placeholder={`${userProfile.name}`}
                  onChange={(e) => setUsername(e.target.value)}
                ></Stnameinput>
                {username}
                <Button
                  text="프로필 업데이트"
                  width="20%"
                  onClick={updateUser(username, avatar)}
                ></Button>
                <Link to="/Mypage">
                  <Button
                    type="button"
                    text="mypage돌아가기"
                    width="70%"
                  ></Button>
                </Link>
              </div>
            </StLogWrapper>
          </StLogCard>
        </>
      )}
    </div>
  );
};

export default InfoFix;

const Stnameinput = styled.input`
  border: 1px solid red;
`;

const StLogCard = styled.div`
  width: 80%;
  max-height: 120px;
  display: flex;
  align-items: center;
  gap: 1.2rem;
`;

const StLogWrapper = styled.div`
  display: flex;
  flex-direction: column;
  width: 100%;
  gap: 0.5rem;
  overflow: hidden;
  & div {
    display: flex;
    flex-direction: row;
    align-items: center;
    gap: 0.5rem;
  }
  & p {
    display: -webkit-box;
    -webkit-line-clamp: 3;
    -webkit-box-orient: vertical;
    overflow: hidden;
    text-overflow: ellipsis;
    font-size: 14px;
    line-height: 1.6;
  }
`;
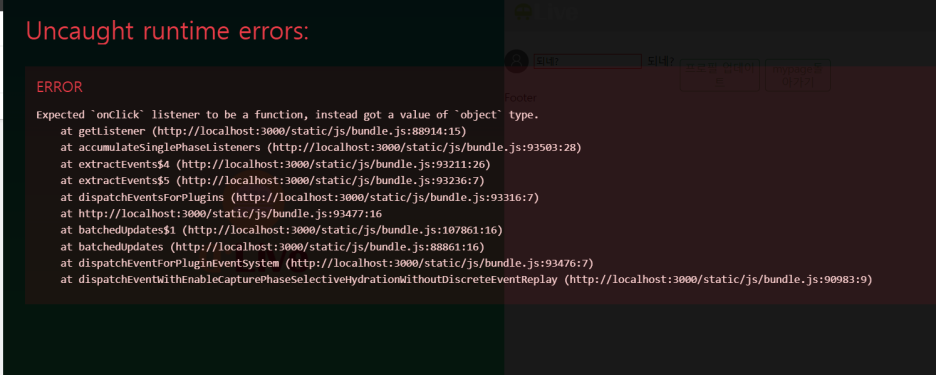
사진 설명을 입력하세요.
문제는 값은 수정되었는데 뜨는 오류..! 이걸 안뜨게 해야겠습니다
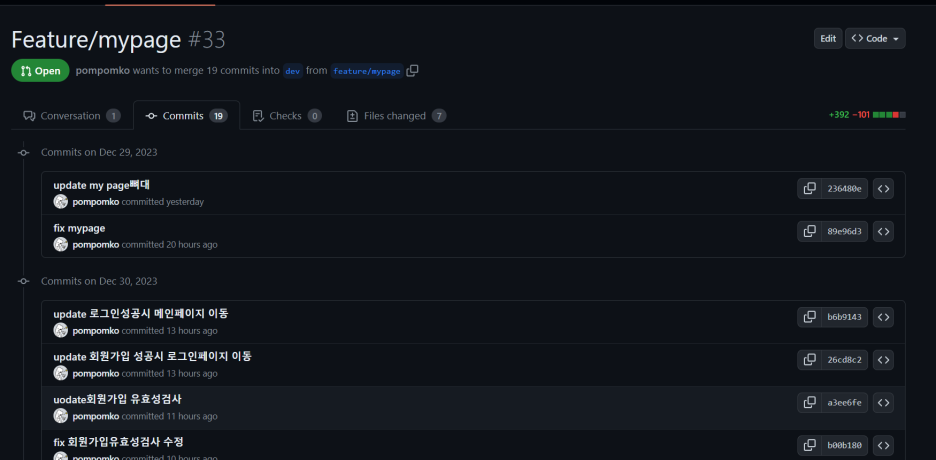
사진 설명을 입력하세요.
현재 시간 오후 3시41분... 너무나도 비효율적이였지만 아무것도 안한것보다는 진전되었다

사진 설명을 입력하세요.
아래부분에 uid와 게시글을 연결시켜 map을 이용해 보여줄 예정 로그인 부분에서
오류가 너무많이났다
input과 buuton을 같이쓰면서 form 태그를 안썼다던지
useEffect 에서 asyc 써놓고 awit을 빼먹는 다던지
내가 직접 짠 코드가 아니라 그럴지도 모르겠다

사진 설명을 입력하세요.
12시간은 넘게 한거같은데 꼴랑 700줄 건드렸다
평소에 좀 해놓을걸 일단 오늘은 여기까지 몸이 슬슬 무리다